Wizard
RMRK wizard.rmrk.dev (opens in a new tab) provides a convenient way for anyone to get started building their own Modular NFT solution. It allows the developer to select the preferred RMRK modules, minting method, transferability status, and token URI setting. Depending on the developer’s experience and needs, the Wizard can grant the user a ready-to-use implementation or an implementation that can be further modified to satisfy the project’s needs.
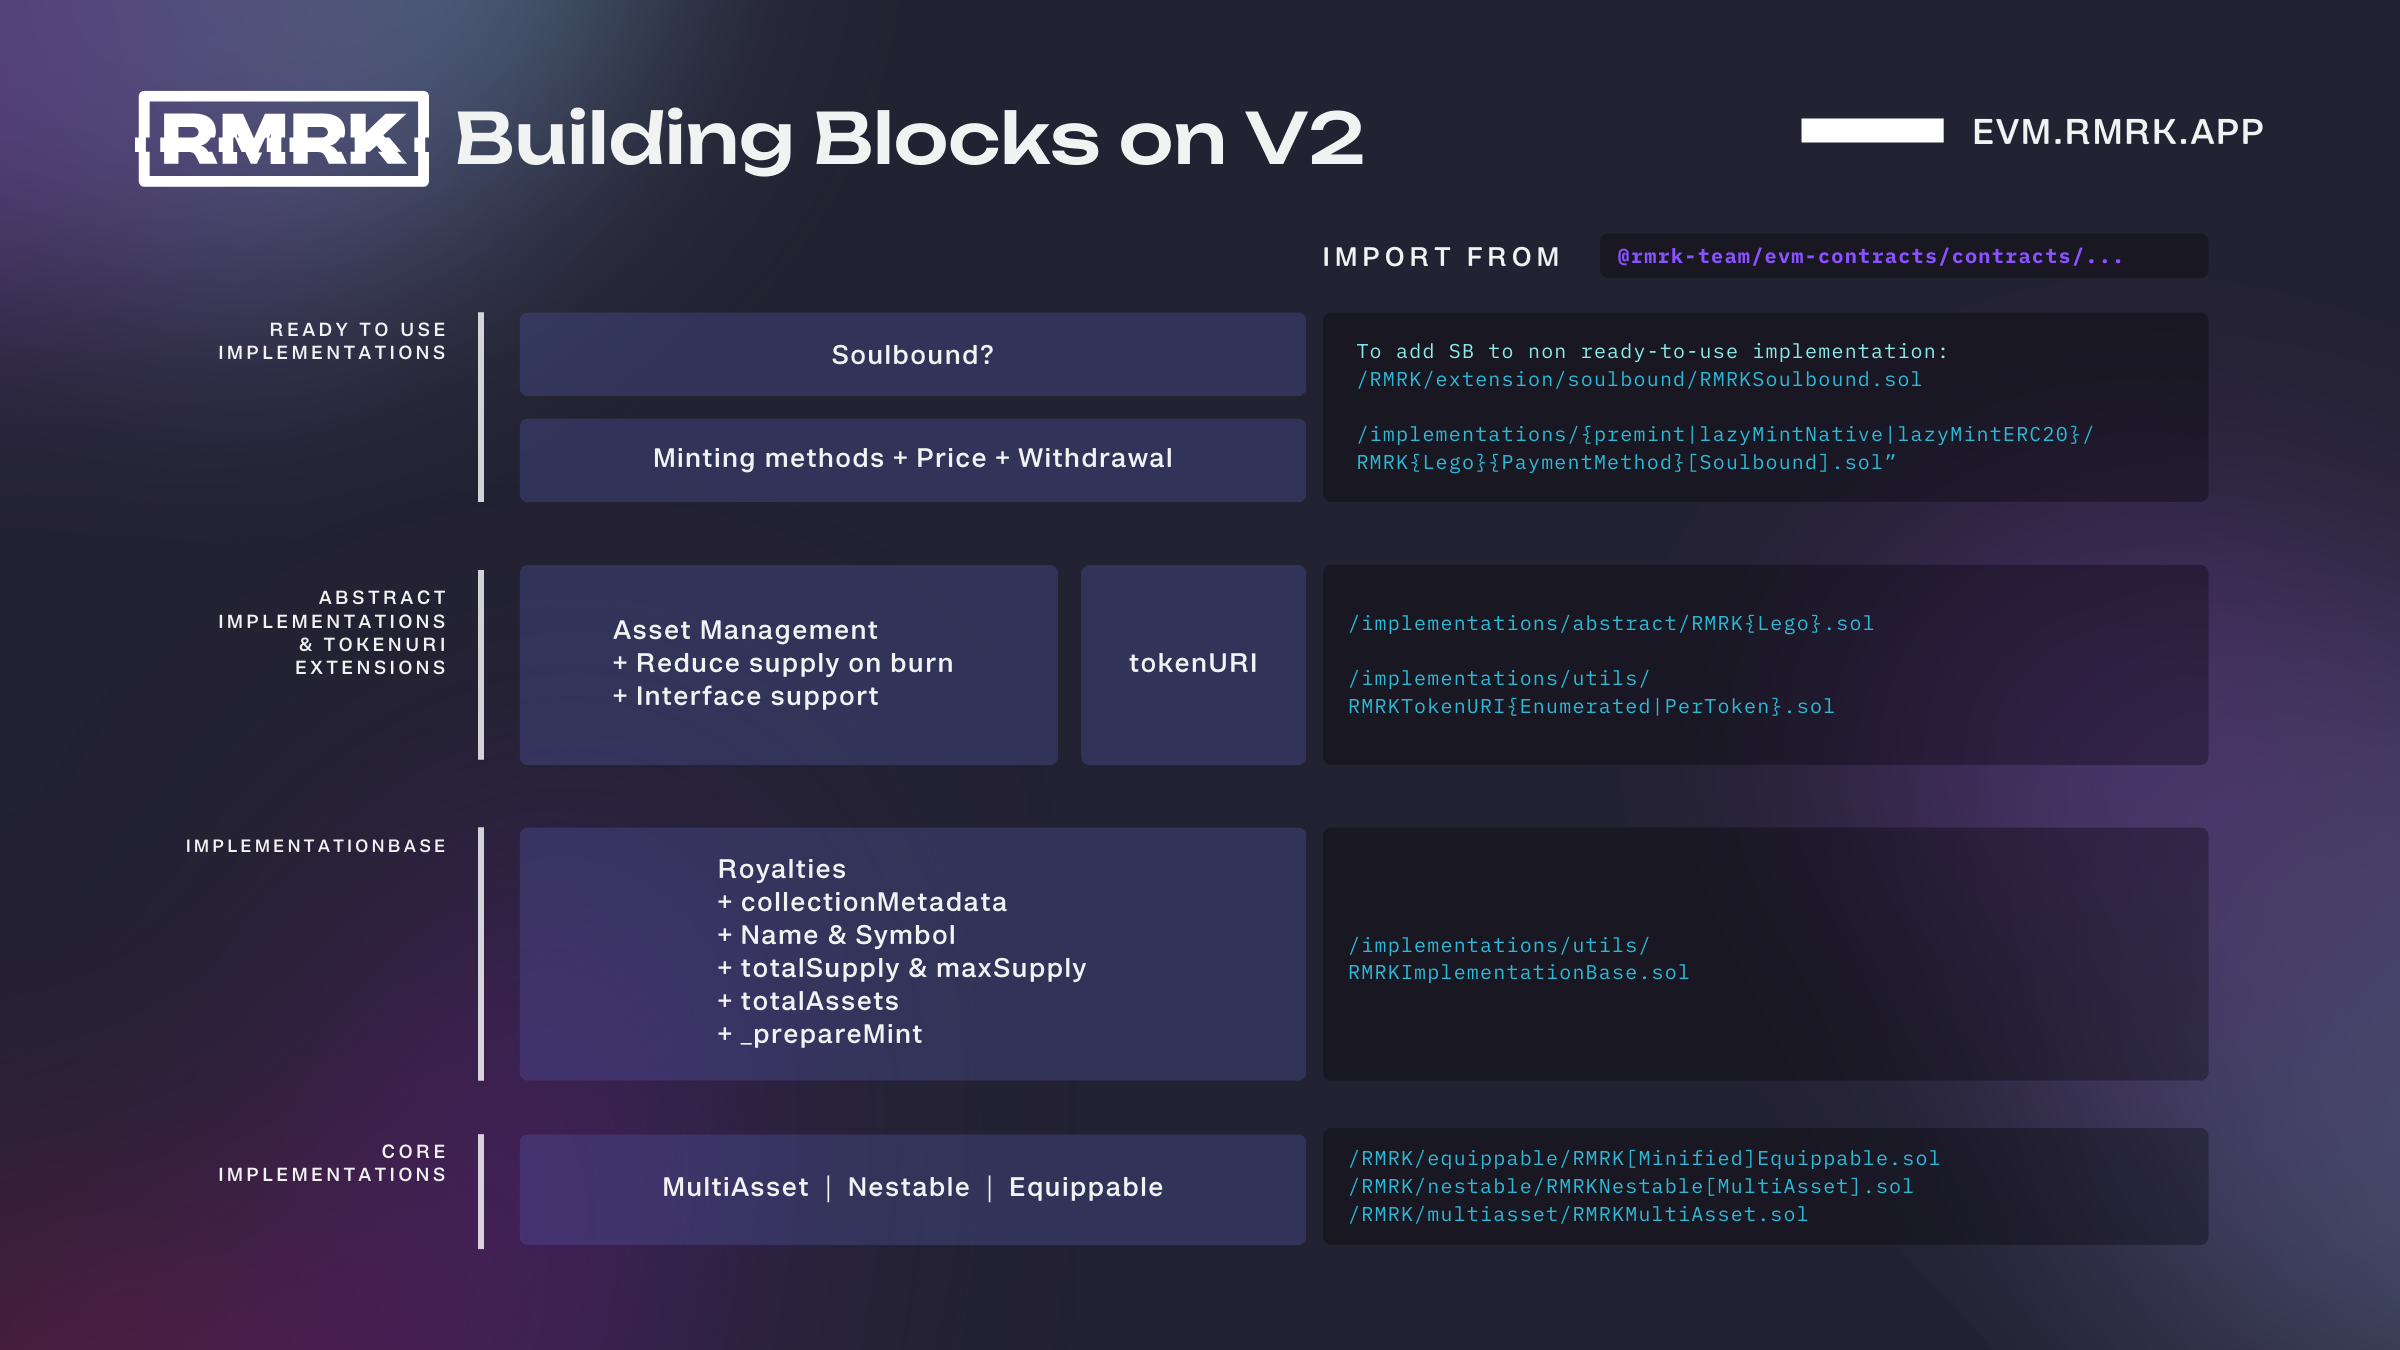
By default, the wizard will start from the most complete building blocks, but you can customize it to your needs and start at any level.
Ready-to-use
The ready-to-use setting gives you the ability to decide whether you want the generated smart contract to be fully implemented and ready to deploy and use or whether you want to customize it yourself.
The benefit of using the fully implemented, ready-to-use smart contract is that you can deploy it as is, and you don’t need to spend time implementing your own business logic. This is a great option for artists with some but limited knowledge of coding to showcase and disseminate their art and for projects that don’t need elaborate business logic in their smart contracts.
By unchecking this option, you can create more tailored solutions, all the while ensuring compatibility with the ERCs that we published.
There are two options that you can select here:
- Continue with the minimal implementation, which allows you to modify the existing functions without the need to override them.
- Remove it and keep only annotations in the form of
TODOsnoting where the business logic should be added with suggestions on what to implement.
Lego
The Lego selection allows you to choose the RMRK Lego you wish to utilize.
- If you are uncertain about the future of your project and cannot decide which Lego to choose, we suggest using the Equippable one.
- If you know that your project only requires multiple assets for tokens but does not need any other Modular NFT primitives, you should select the MultiAsset Lego.
- If you know that you will not need multiple assets for your tokens and only require the ability to nest them, then use the Nestable Lego.
- You also have the option to select Nestable and MultiAsset Legos together, which allows you to build tokens with the ability to have multiple assets and be nested but not composable through equipping.
We strongly suggest using the Equippable RMRK module to ensure forward compatibility with whatever utility your tokens evolve into.
Using any other module combination should only be done if your business logic causes your smart contracts to become too big to deploy, but even then, you should examine your smart contract architecture to extract some of the business logic to another smart contract.
Minting Method
We provide support for three different minting methods:
- Pre-Mint
- Native Token Lazy Mint
- ERC-20 Token Lazy Mint
Depending on how you wish your tokens to be minted, you should select the appropriate option.
When using ERC-20 tokens to interact with your smart contract, the approval to interact with the tokens needs to be granted to your smart contract. Without the approval, users won’t be able to mint their NFTs using ERC-20 tokens.
Soulbound
The transferability of the token can be limited using ERC-6454. The Soulbound option adds support for it. Transferability conditions can be further modified by overriding the isTransferable method. Using this option, you can disable transfers for the tokens that shouldn’t be transferred or limit the transfers based on the destination or sender.
Using the Soulbound option makes all tokens non-transferable. Without additional custom logic, owners will never be able to transfer them.
Token URI
The Token URI section defines how a given token’s URI is served. This option is used by wallets and marketplaces to gain access to the token’s metadata. The options we provide are:
- Enumerate
- Per token
- Top Priority
Additional configuration
There are more arcane powers that the RMRK Wizard (opens in a new tab) has! Let’s check them out.
Auto-accept child tokens
Nesting a child token into a parent token is a two-step process. It follows a propose-commit pattern where you transfer the child token into the parent token and then accept it as a child token. We provide the ability to circumvent this two-step process in the event that the owner of the child token being transferred is also the owner of the parent token.
Lock supply
The token supply of the collection is defined upon the deployment. We provide the option to reduce it to the current supply if you decide that no more tokens should be minted, even if the maximum token supply that was defined upon deployment has not been reached yet.
Deploy script generation
RMRK Wizard (opens in a new tab) builds the Deploy script for you. If you decide to deploy the smart contracts in one of the development frameworks, like Hardhat (opens in a new tab), the wizard auto-generates the deploy script for you. Additionally, you have the ability to open the desired configuration of the smart contract directly in Remix IDE (opens in a new tab).
The deploy script generator accepts additional values like collection metadata URI, maximum supply of tokens, price per mint (if applicable), royalties configuration, and more. These values are automatically filled into the deploy script so that the script is ready to be run as soon as you import it into your project.
All of our legos are compatible with ERC-2987 royalties, so they need to be configured when the smart contracts are deployed. If you don’t wish to receive royalties, you can always configure the royalty percentage as 0.
Additional reference
In addition to all of the development help provided by the wizard, it also provides concise instructions on how to set up, build, and deploy your Modular NFT project using the [wizard.rmrk.RMRK Wizardps://wizard.rmrk.dev).
Since you need to have your metadata for the tokens, smart contracts, and assets properly configured in order for them to be compatible with wallets and marketplaces, the RMRK Wizard (opens in a new tab) contains the section documenting the structure of metadata for each category along with examples of what the actual metadata looks like.
Remix or Hardhat
From the wizard, you can directly open your smart contract in Remix IDE (opens in a new tab). Remix will automatically install all the needed packages and will be ready to compile and deploy. We recommend this path if you do not have any further logic you want to add to your smart contract.
If you want to add additional logic to your smart contract, we recommend you clone our EVM-template and download the smart contract and deploy script generated by the wizard. You can then modify the smart contract, add tests, deploy and verify using Hardhat (opens in a new tab).
We strongly encourage you to add tests to your smart contracts in this case, and to first deploy to a testing network to make sure everything works as expected.