Equippable & Composable Journey (Part 1, Setup)
A contextualized user journey to explore and understand the Equippable & Composable NFT features
In this journey we will explore the main features of Equippable and Composable standard. We will use Ready to Use implementation for Equippable with PreMint. For more information on the available implementations see the implementations section. We have chosen the PreMint implementation because it allows us, contract owners, to mint tokens at no cost.
The use cases that will be explored are:
- Creation of an NFT collection that supports composable and equippable NFTs.
- Configuration of equippability in parent, child and catalog.
- Equipping NFTs into another.
We will guide you through the process using both Remix and Hardhat, starting from the code wizard in each case. Interactions will be done using scripts with hardhat.
Creating the Smart Contract.
This tutorial will use Hardhat only, since we will be using a local network to deploy the contract and render the equipped assets.
Clone the template
Use the evm-template repository (opens in a new tab) to create a new repository and clone it locally.

Install dependencies
Open a terminal on your project folder and install the dependencies with your favorite package manager: yarn | npm i | pnpm i. This tutorial will use pnpm.
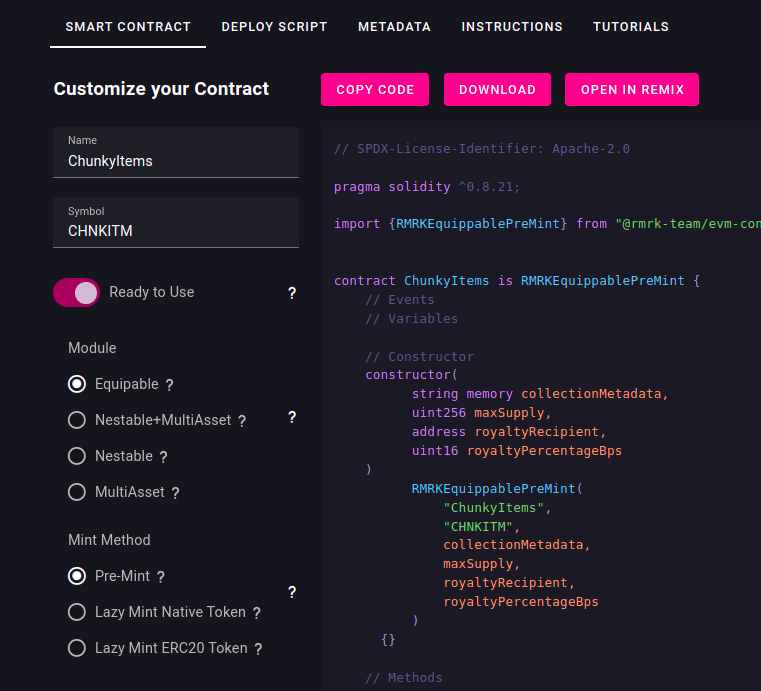
Create the Chunkies contract
Go to wizard.rmrk.dev (opens in a new tab) and configure the Chunkies contract.
- Set the name to "Chunkies"
- Set the symbol "CHNK"
- Select Module to be Equippable
- Select Mint Method to Pre-Mint
- Enable Auto-accept children option. We will use this to configure automatic accceptance of known equippable children.
- Download the contract and place it under the
contractsfolder of the cloned repository. - You may delete the
SimpleEquippable.solfile, as it is not needed. - You may also delete
tests/equippable.tsor update it so it uses the new contract.

Get Chunkies deploy scripts
Without reloading or changing the configuration on the "Smart Contract" tab, go to "Deploy Script".
- Set collection metadata URI to:
ipfs://QmadB7RnpfXSd2JX1e6HZLBKwSkBR3PiXhTmkN9dE5DKur/chunkies/collection.json - Set the Max supply to 100.
- Leave the Royalty receiver empty, so it uses deployer account as receiver.
- Set Royalty percentage to 3%.
- Enable the "Use 2 scripts" option. This way, the wizard will generate a script with the methods to deploy and another one to actually run the deployment.
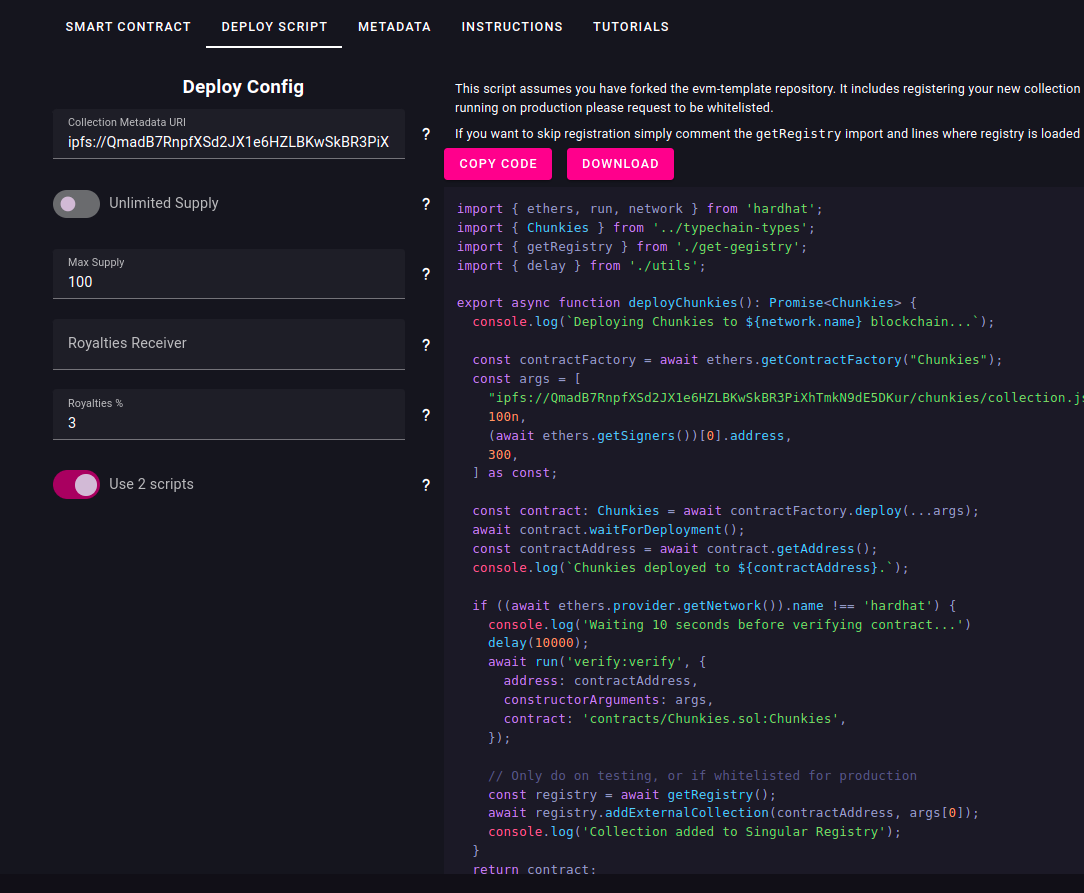
- Copy the
deployChunkiesmethod into yourdeploy-methods.tsfile. Also update imports to includenetwork,getRegistryandChunkyItems. Keep the existing methods, we will use them later. - Download the second script, which runs the deploy. You may overwrite the existing
scripts/run-deploy.tsfile.
Create the Chunkies Items contract
Go to wizard.rmrk.dev (opens in a new tab) and configure the Chunky Items contract.
- Set the name to "ChunkyItems"
- Set the symbol "CHNKITM"
- Select Module to be Equippable
- Select Mint Method to Pre-Mint
- Download the contract and place it under the
contractsfolder of the cloned repository.
Get Chunkies Items deploy scripts
Without reloading or changing the configuration on the "Smart Contract" tab, go to "Deploy Script".
- Set collection metadata URI to:
ipfs://QmadB7RnpfXSd2JX1e6HZLBKwSkBR3PiXhTmkN9dE5DKur/items/collection.json - Set the Max supply to 100.
- Leave the Royalty receiver empty, so it uses deployer account as receiver.
- Set Royalty percentage to 3%.
- Enable the "Use 2 scripts" option. This way, the wizard will generate a script with the methods to deploy and another one to actually run the deployment.
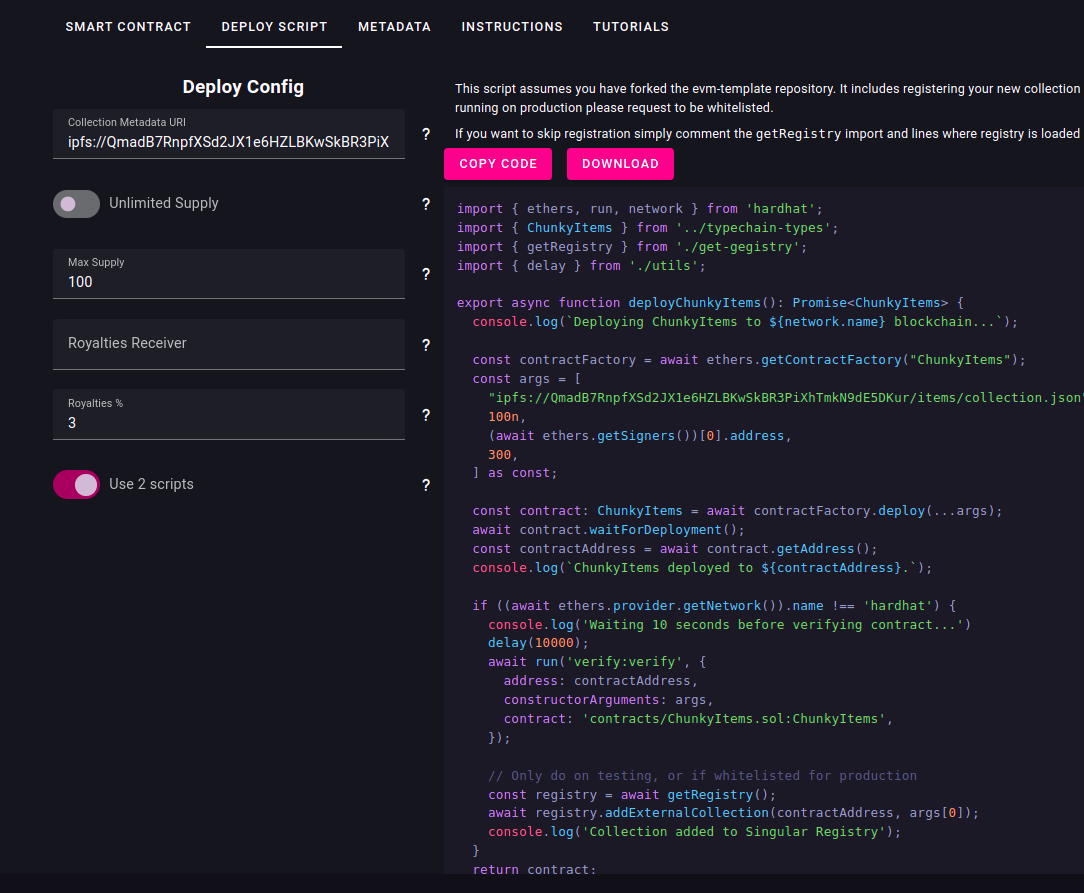
- Copy the
deployChunkyItemsmethod into yourdeploy-methods.tsfile. Also update import fromtypechain-typesto includeChunkyItems - On your
run-deploy.tsfile, add thedeployChunkyItemsimport and add a call to it afterdeployChunkiesmethod. Your file should look like this:
import { deployChunkies, deployChunkyItems } from './deploy-methods';

async function main() {
  await deployChunkies();
  await deployChunkyItems();
}

main().catch((error) => {
  console.error(error);
  process.exitCode = 1;
});
Your deploy-methods.ts file should look like this:
import { ethers, run, network } from 'hardhat';
import {
  Chunkies,
  ChunkyItems,
  RMRKCatalogImpl,
  RMRKBulkWriter,
  RMRKCatalogUtils,
  RMRKCollectionUtils,
  RMRKEquipRenderUtils,
  RMRKRoyaltiesSplitter,
} from '../typechain-types';
import { getRegistry } from './get-gegistry';
import { delay, isHardhatNetwork } from './utils';

// Add your deploy methods here:

export async function deployChunkies(): Promise<Chunkies> {
  console.log(`Deploying Chunkies to ${network.name} blockchain...`);

  const contractFactory = await ethers.getContractFactory('Chunkies');
  const args = [
    'ipfs://QmadB7RnpfXSd2JX1e6HZLBKwSkBR3PiXhTmkN9dE5DKur/chunkies/collection.json',
    100n,
    (await ethers.getSigners())[0].address,
    300,
  ] as const;

  const contract: Chunkies = await contractFactory.deploy(...args);
  await contract.waitForDeployment();
  const contractAddress = await contract.getAddress();
  console.log(`Chunkies deployed to ${contractAddress}.`);

  if (!isHardhatNetwork()) {
    console.log('Waiting 10 seconds before verifying contract...');
    delay(10000);
    await run('verify:verify', {
      address: contractAddress,
      constructorArguments: args,
      contract: 'contracts/Chunkies.sol:Chunkies',
    });

    // Only do on testing, or if whitelisted for production
    const registry = await getRegistry();
    await registry.addExternalCollection(contractAddress, args[0]);
    console.log('Collection added to Singular Registry');
  }
  return contract;
}

export async function deployChunkyItems(): Promise<ChunkyItems> {
  console.log(`Deploying ChunkyItems to ${network.name} blockchain...`);

  const contractFactory = await ethers.getContractFactory('ChunkyItems');
  const args = [
    'ipfs://QmadB7RnpfXSd2JX1e6HZLBKwSkBR3PiXhTmkN9dE5DKur/items/collection.json',
    100n,
    (await ethers.getSigners())[0].address,
    300,
  ] as const;

  const contract: ChunkyItems = await contractFactory.deploy(...args);
  await contract.waitForDeployment();
  const contractAddress = await contract.getAddress();
  console.log(`ChunkyItems deployed to ${contractAddress}.`);

  if (!isHardhatNetwork()) {
    console.log('Waiting 10 seconds before verifying contract...');
    delay(10000);
    await run('verify:verify', {
      address: contractAddress,
      constructorArguments: args,
      contract: 'contracts/ChunkyItems.sol:ChunkyItems',
    });

    // Only do on testing, or if whitelisted for production
    const registry = await getRegistry();
    await registry.addExternalCollection(contractAddress, args[0]);
    console.log('Collection added to Singular Registry');
  }
  return contract;
}

// The rest of the methods included on the original file:
// - deployBulkWriter
// - deployCatalogUtils
// - deployCollectionUtils
// - deployRenderUtils
// - deployCatalog
// - verifyIfNotHardhat
Your project structure should look like this at this point:
- Chunkies.sol
- ChunkyItems.sol
- MockRMRKRegistry.sol
- deploy-methods.ts
- get-gegistry.ts
- run-deploy-catalog.ts
- run-deploy-utils.ts
- run-deploy.ts
- utils.ts
Configure your .env file.
Create a .env file by copying and renaming the .env.example file. Remember to set your private key in the PRIVATE_KEY var if you are going to deploy in an actual blockchain. For local tests, the default value will do.
In the .env file, set the {BLOCK_SCANNER}_API_KEY for the networks you want to use. You can get keys easily from the block scanner of your network. This is also not needed for local tests since contract verification is skipped when running on hardhat network.
API_KEY from block scanners can be acquired by signing in from the mainnet chain explorer, registration is free. The API_KEY you get from it works for production and testing networks. Here are the block scanners from the most common networks: Ethereum (opens in a new tab), Polgyon (opens in a new tab), Moonbeam (opens in a new tab), Astar (opens in a new tab), Base (opens in a new tab), BSC (opens in a new tab).
Compile the contracts and deploy to local hardhat network:
pnpm compile
pnpm deploy:contracts
You should see a similar output to this:
> @rmrk-team/evm-template@2.4.3 compile /path/to/chunkies
> hardhat compile

Generating typings for: 47 artifacts in dir: typechain-types for target: ethers-v6
Successfully generated 150 typings!
Compiled 48 Solidity files successfully (evm target: london).

> @rmrk-team/evm-template@2.4.3 deploy:contracts /path/to/chunkies
> hardhat run scripts/run-deploy.ts

Deploying Chunkies to hardhat blockchain...
Chunkies deployed to 0x5FbDB2315678afecb367f032d93F642f64180aa3.
Deploying ChunkyItems to hardhat blockchain...
ChunkyItems deployed to 0xe7f1725E7734CE288F8367e1Bb143E90bb3F0512.
Congratulations! You have deployed your first Equippable & Composable contract. We will do some improvements to our contracts, so let's not deploy them into a real blockchain for now.
Prepare a file with constants.
To avoid having mysterious numbers during configuration of our contract, let's define all the ones we plan to use in a constants.ts file under scripts directory. It will include:
- IPFS Uris for collections and catalog metadata.
- Base IPFS
- Fixed and slot part ids for chunkies.
- Indexes for each fixed and slot parts.
- Equippable group Ids.
Copy the following contents into your constants.ts file:
const BASE_IPFS_URI = 'ipfs://QmadB7RnpfXSd2JX1e6HZLBKwSkBR3PiXhTmkN9dE5DKur';

// Collection metadata
const CHUNKY_METADATA = BASE_IPFS_URI + '/chunkies/collection.json';
const CHUNKY_ITEM_METADATA = BASE_IPFS_URI + '/items/collection.json';

// Catalog
const CHUNKY_CATALOG_METADATA = BASE_IPFS_URI + '/catalog/metadata.json';
const CHUNKY_CATALOG_TYPE = 'image/*';
const CHUNKY_ITEM_LEFT_SLOT_METADATA = BASE_IPFS_URI + 'catalog/slots/item-left.json';
const CHUNKY_ITEM_RIGHT_SLOT_METADATA = BASE_IPFS_URI + 'catalog/slots/item-right.json';

// Items metadata
const CHUNKY_ITEM_BASE_METADATA_URI = BASE_IPFS_URI + 'items/';

// FIXED PARTS
const CHUNKY_V1_HEAD_FIXED_PART_ID = 1;
const CHUNKY_V1_BODY_FIXED_PART_ID = 2;
const CHUNKY_V1_HANDS_FIXED_PART_ID = 3;
const CHUNKY_V2_HEAD_FIXED_PART_ID = 4;
const CHUNKY_V2_BODY_FIXED_PART_ID = 5;
const CHUNKY_V2_HANDS_FIXED_PART_ID = 6;
const CHUNKY_V3_HEAD_FIXED_PART_ID = 7;
const CHUNKY_V3_BODY_FIXED_PART_ID = 8;
const CHUNKY_V3_HANDS_FIXED_PART_ID = 9;
const CHUNKY_V4_HEAD_FIXED_PART_ID = 10;
const CHUNKY_V4_BODY_FIXED_PART_ID = 11;
const CHUNKY_V4_HANDS_FIXED_PART_ID = 12;

// SLOT PARTS
const CHUNKY_LEFT_HAND_SLOT_PART_ID = 1001;
const CHUNKY_RIGHT_HAND_SLOT_PART_ID = 1002;

// PART TYPES (Defined by standard)
const PART_TYPE_SLOT = 1;
const PART_TYPE_FIXED = 2;

// Z INDEXES
const Z_INDEX_BODY = 2;
const Z_INDEX_HEAD = 4;
const Z_INDEX_HAND_ITEMS = 6;
const Z_INDEX_HANDS = 8;

// Equippable groups
const EQUIPPABLE_GROUP_FOR_CHUNKIES_DEFAULT = 1; // Only in case we want all chunkies to be later equippable into something
const EQUIPPABLE_GROUP_FOR_ITEMS_LEFT_HAND = CHUNKY_LEFT_HAND_SLOT_PART_ID;
const EQUIPPABLE_GROUP_FOR_ITEMS_RIGHT_HAND = CHUNKY_RIGHT_HAND_SLOT_PART_ID;

export {
  BASE_IPFS_URI,
  CHUNKY_METADATA,
  CHUNKY_ITEM_METADATA,
  CHUNKY_CATALOG_METADATA,
  CHUNKY_CATALOG_TYPE,
  CHUNKY_V1_HEAD_FIXED_PART_ID,
  CHUNKY_V1_BODY_FIXED_PART_ID,
  CHUNKY_V1_HANDS_FIXED_PART_ID,
  CHUNKY_V2_HEAD_FIXED_PART_ID,
  CHUNKY_V2_BODY_FIXED_PART_ID,
  CHUNKY_V2_HANDS_FIXED_PART_ID,
  CHUNKY_V3_HEAD_FIXED_PART_ID,
  CHUNKY_V3_BODY_FIXED_PART_ID,
  CHUNKY_V3_HANDS_FIXED_PART_ID,
  CHUNKY_V4_HEAD_FIXED_PART_ID,
  CHUNKY_V4_BODY_FIXED_PART_ID,
  CHUNKY_V4_HANDS_FIXED_PART_ID,
  CHUNKY_LEFT_HAND_SLOT_PART_ID,
  CHUNKY_RIGHT_HAND_SLOT_PART_ID,
  PART_TYPE_SLOT,
  PART_TYPE_FIXED,
  Z_INDEX_BODY,
  Z_INDEX_HEAD,
  Z_INDEX_HAND_ITEMS,
  Z_INDEX_HANDS,
  EQUIPPABLE_GROUP_FOR_CHUNKIES_DEFAULT,
  EQUIPPABLE_GROUP_FOR_ITEMS_LEFT_HAND,
  EQUIPPABLE_GROUP_FOR_ITEMS_RIGHT_HAND,
  CHUNKY_ITEM_LEFT_SLOT_METADATA,
  CHUNKY_ITEM_RIGHT_SLOT_METADATA,
  CHUNKY_ITEM_BASE_METADATA_URI,
};
Great work on completing Part 1! Now, get ready for Part 2, where things get even more exciting.